Installation Guide
You can translate the content of this page by selecting a language in the select box.
Notes
Very heavy
Requires 2 or more able bodies
Following instructions must be followed for warranty to be valid
Rough opening must be 1" to 2" wider and ½" to 1" taller minimum
Protect product at all times
- NEVER leave uncovered
- NEVER allow the product or shipping package to get wet
- ATTENTION remove nails from crate prior to removing product to avoid scratching the product
Must be a licensed contractor
Store product correctly
- Always remove shipping packaging when received
- Always store in a dry and safe place using fabric padding
- Never use shipping packages to store the product
- Always wipe any moisture of product as moisture will cause product fnish to bubble and rust
- Keep crate, pallet, and all packaging materials in case concealed damage is detected.
Hardware specifications

Waterproofing preparations required before installation
Always follow waterproof manufacturers instructions and guidelines
Tools


Tips


Match Doors with Frames
Avoid Damage to Finish on Door and Frame Doors are manufactured as one unit with their frames. If you have received multiple sets of the same size door, match the serial number of the frame with the door(s).
Refer to the CAD drawing that is on the packaging of the doors & frame (see below illustration). Ensure you match the entire serial # & do not mix serial numbers between units. Hanging doors on the incorrectly matched frame can result in alignment issues.
Serial Number

Opening Wooden Box
Tools


Door Frame with Sidelights
Installing Door Frame with Sidelights


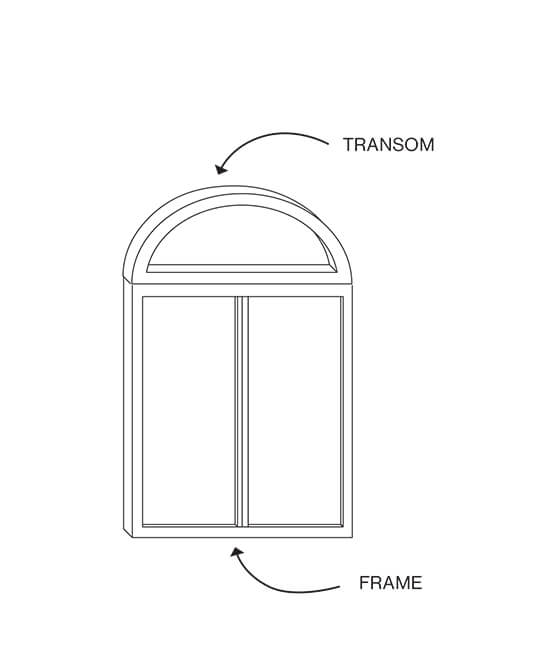
Door Frame with Transom
Installing Door Frame with Transom

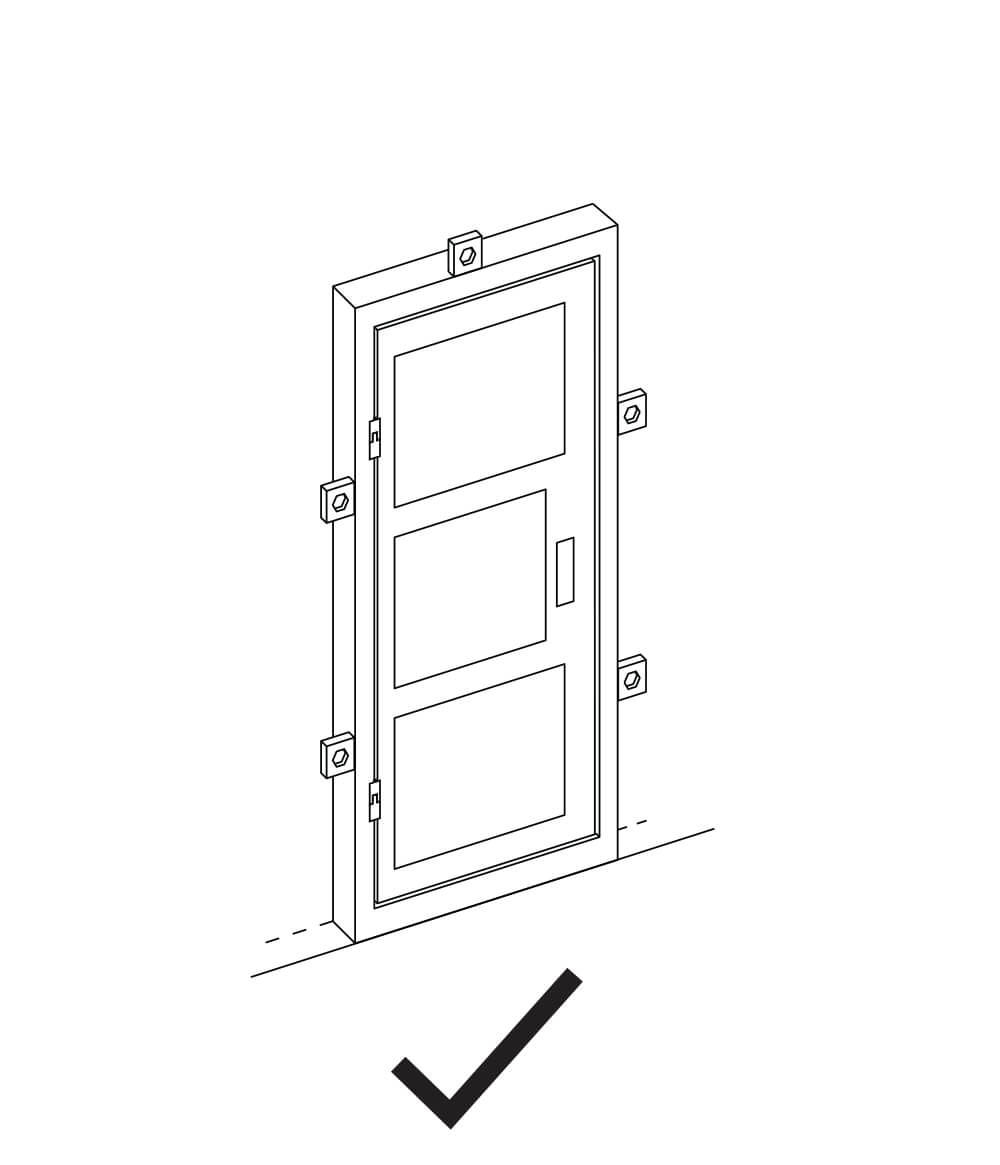
Installing an Exterior Double Door
Barn Door
Installing a Barn Door


Bi-Fold Door
Installing a Bi-fold Door


Overhang and Sill Pan

Overhang
All exterior units should have proper over hang and drip caps should be installed over the units at all times.
Sill Pans
Sill pans should be installed prior to frame installation for maximum protection against water intrusion.
Leveling door Frame of Single and Double Door


Hanging the Door

Door Fit Adjustment
Please note the weight of these doors will flex and change the shape of frame to the unlevel surface. This will also affect lock operations.


*This will also effect lock operations.


*This will also effect lock operations.


Roller Catch

*If there is a loud clicking sound or if it’s hard to open, use a screwdriver to adjust the spring tension.
**Do not use a drill.

How to Cut Weatherstrips

Weatherstripping to be trimmed after doors are fully installed. Please note on how this is trimmed on top and bottom of weatherstripping. Ends of weatherstipping to be fush with top and bottom of frame.
Lock Strike Plates
If the door is not 100% level (And even with the door being level, the strike plate may still require some fling adjustments), the latch and deadbolt strikes will not strike correctly into the opposing strike plate. In this case, you will need to fle down the opening of the strike plate in order for the latch to secure correctly.
On a wooden door, it is easy to notch out the wood to change the location of the strike plate, but because an iron door is
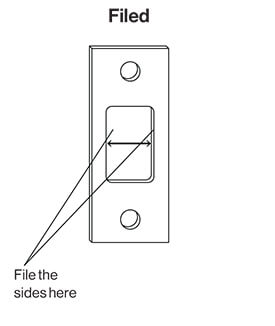
metal, instead of cutting and welding new metal, this fling of the plate is the solution for small strike issues. Our strike areas are standard* sizes and the plates can be purchased at your local hardware store
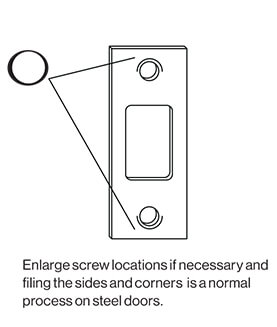
Please reference the diagram on the left for an example of a strike plate that has been fled vs. one that has not.
There are also times when the screw locations on the strike

plates may not line up 100% perfectly with the threading on our doors. In this case, you will need to drill the holes strike plate larger to align the screw holes. The bottom left diagram shows those locations as well.
*Filing adjustments may be needed depending on the lock manufacturer as they may not provide the correct size strike plate for our metal doors.


Interior Frame Assembly


Storing of Doors & Frames
Avoid Damage to Finish on Door and Frame.
Pinky’s Iron Doors is not responsible for any damages due to improper storage or exposure to moisture, water,or humidity.
Our doors and frames are packaged for transport only. The plastic wrapping is only for shipping purposes and will not protect doors and frames against elements such as water
moisture* or humidity**. Please make sure to remove both doors and frames from all packaging if you will be storing them for a future install date. Use towels and make sure to store in a safe place as the frame is top heavy.
*Paint bubbling may be caused by water/humidity if stored in plastic wrapping and left enclosed.
*Avoid any type of moisture from getting into packaging as it will not be able to escape and will
cause the paint to bubble or rust. *If your doors/frames happen to get wet, they MUST be wiped down IMMEDIATELY. *If your doors/frames get wet during offload or during storage, remove doors from the box immediately to avoid damage.
**Doors/frames that will be stored in humid areas will also need to be opened from transportation package immediately to avoid damage.
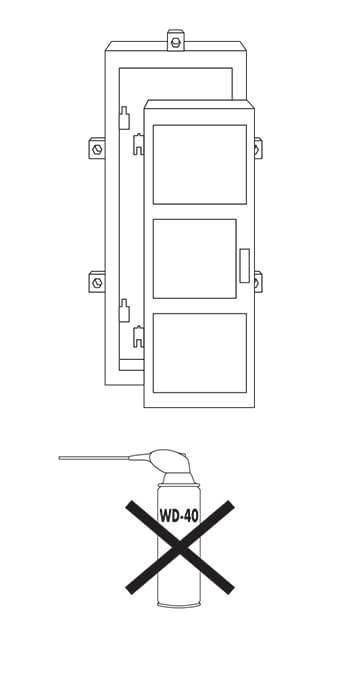
Cleaning & Maintaining Iron/Steel Doors & Windows


Avoid Damage to Finish on Door and Frame.
It is important to maintain your new iron/steel doors and windows throughout the year. We recommend you wipe down your door/window at least once a month with our Iron Door Spray
DO NOT USE ANY WATER, CHEMICAL CLEANING AGENTS, AND/OR ANY KIND OF SOAP (INCLUDING, BUT NOT LIMITED TO, DISH SOAP, LAUNDRY DETERGENT, BODY SOAP, ETC)
Using water, soap, and chemical cleaning agents will lead to rust
and cause the paint on the door to dry out (removing the moisture from the paint), and may eventually lead to cracking/peeling of paint, discoloration, etc, over time.
Caution: Only use Blue Painters Tape on Pinkys Product
Avoid Damage to Finish on Door and Frame.
Pinkys Iron Doors is not liable for any damages caused by misuse of tapes and adhesives on your Pinkys product.
Please do not use any tape or adhesive other than blue painters tape to mask, cover,
or for any purpose on your Pinkys products.
If the blue painters tape is needed for extended amounts of time, please replace tape regularly as the sun can bake the adhesive onto the painted area.
If you must use red duct tape for stucco work or otherwise,
please first apply the blue painters tape and mask with red duct tape over the blue painters tape to avoid any contact with the door/frames paint itself
Using any other type of tape directly on your Pinky’s products will result in peeling/bubbling of the paint.
Hinge Maintenance
Please grease the hinges once a year at the bare minimum, if you hear squeaking noises, please grease them right away. Failure to do so will result in the hinges breaking due to friction.

If you need installation assistance, please contact us at: support@pinkys.com or (844) 843-6677 & Visit www.PINKYS.com
We provide free remote support only and will not come out to jobs sites.
If you have any installation issues or questions, please send us an email with all necessary (Well-lit & Quality) photos along with an explanation regarding the issue. One of our technicians will review your inqury and guide you through email or phone.